Exhaust mounting parts do more than hold a pipe in place. Rubber hangers support the system, limit movement, and help keep hot metal away from nearby components. If mounts sit too close together, the pipe may sag or place extra strain on joints. If they are too far apart, long sections can vibrate, knock against the chassis, or shift when the vehicle moves. Small gaps matter.
So, What is the proper spacing for exhaust mounting parts? There is no reliable universal measurement. The right distance depends on the vehicle, exhaust layout, pipe weight, hanger design, and manufacturer’s specifications. A useful starting point is the factory service information for that exact model. Aftermarket systems may require different positions, so their installation instructions matter too.
This guide explains how to assess mount spacing, check alignment, and spot common fitment problems. Look for even support along the system, secure rubber isolators, and adequate clearance around the floor, suspension, and heat-sensitive parts. Check the exhaust when it is cool, and consider how it moves as the engine shifts and the pipes expand with heat. A static inspection can miss that movement. Even a tidy-looking installation may be under tension; that detail is easy to overlook. When specifications are unclear or the system will not sit naturally, a qualified technician can inspect the fit before parts wear or contact damage occurs.
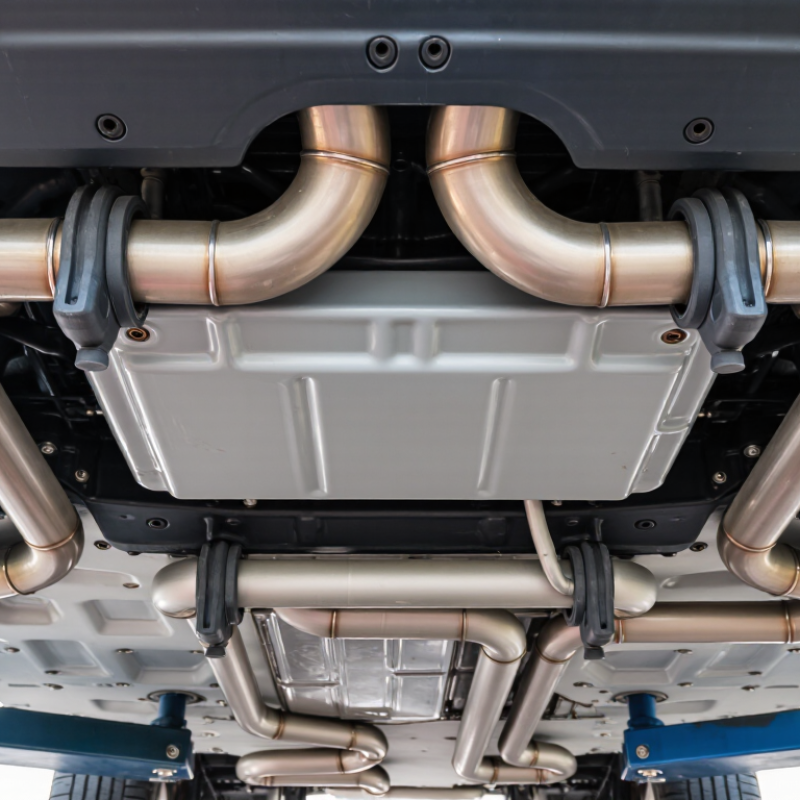
Identify Exhaust Mounting Parts and Their Locations
Exhaust mounting parts support the system while allowing it to move slightly as it heats and cools. Start near the engine and follow the pipe toward the rear. At joints, look for flanges, bolts, and clamps; these connect pipe sections and help seal them. Under the vehicle, metal hanger rods usually extend from the pipe or muffler into rubber isolators attached to the body. The isolators are often near bends, the catalytic converter, and the muffler. A heat shield may sit above a hot section, but it is not a support.
Tips: Inspect only when the exhaust is fully cool. Use a light and view each hanger from more than one angle. A cracked rubber sleeve can be hard to spot from below.
At the rear, check the muffler’s inlet and outlet, then locate the nearby hangers and body brackets. Some vehicles have extra supports along a long center pipe. Their positions vary, so compare the left and right sides rather than assuming they match. Look for sagging pipes, shiny rub marks, loose clamps, or rubber stretched to one side. These clues can show where support has shifted. One viewing angle can mislead; confirm each part’s connection before deciding it is missing or misplaced.
Check Manufacturer Specifications and Required Clearances
Before positioning exhaust hangers, check the vehicle’s service information for the specified locations, fastener torque, and minimum clearances. There is no single safe gap for every vehicle: pipe diameter, nearby materials, and suspension movement all affect the requirement. Keep the system clear of brake lines, wiring, fuel components, and body panels, including when the exhaust moves under load. A gap that looks generous on a lift may shrink when the engine shifts.
Thermal growth matters, too. ASM International materials data puts Type 304 stainless steel’s average expansion near 17.3 micrometres per metre per °C between 20°C and 100°C. A 500 mm section would grow about 0.7 mm over that range; hotter exhaust conditions can increase movement. This figure is a reference, not a clearance specification. Follow the vehicle maker’s measurements, and check that joints and hangers allow movement without pulling the pipe against surrounding parts. It is easy to over-trust a cold measurement.
Tips: Measure at several points with the vehicle safely supported, then recheck after tightening. Look for polished rub marks, stretched rubber hangers, or contact after a short drive. If the service data is unclear, confirm the required gap with a qualified exhaust technician.
How to Properly Space Exhaust Mounting Parts
Clearance reference: inches converted to millimeters
Use this conversion chart when checking exhaust mounting clearances against the vehicle or component manufacturer’s specifications. Required clearances vary by vehicle, material, and installation; these conversions are not minimum-clearance recommendations.
Measure the Exhaust System’s Position and Spacing
Measure the exhaust only after the vehicle is parked on a level surface and the system is cool. Support it securely before loosening any mounting parts. A floor jack can hold the pipe steady, but never rely on a jack alone. Note how far the tailpipe sits from the bumper and how each pipe runs beside the chassis. A tape measure, straightedge, and a few photos can make these reference points easier to compare.
Check spacing at every hanger, not just near the muffler. Measure the gap between the pipe and nearby heat shields, suspension parts, fuel lines, and body panels. Leave room for the exhaust to move as the engine rocks and the metal heats up. The correct clearance varies by vehicle, so consult its service information rather than relying on one universal measurement. Small differences matter.
A common fitting mistake is pulling a rubber isolator tight to make the tailpipe look centered. That can preload the mount and cause vibration or early wear. Adjust the pipe in small steps, then check the clearances again from several angles. It may look aligned while the vehicle is still. Check it under load, too, if a qualified technician can do so safely. The first measurement is not always the best one. After tightening the hardware, confirm that the hangers sit naturally and the exhaust does not touch surrounding parts.
Install Mounts to Allow for Heat Expansion and Movement
How to Properly Space Exhaust Mounting Parts
Exhaust mounts need to restrain the system without locking it rigidly in place. Heat makes pipes lengthen; engine movement and road vibration add smaller, repeated shifts. ASM International’s materials-property data gives 304 stainless steel a typical thermal expansion coefficient near 17.3 micrometres per metre per degree Celsius.
For illustration, a one-metre section warming by 500°C can grow about 8.7 millimetres.
That gap matters. A mount placed too close to a bend or hanger may turn ordinary expansion into stress at a weld or flange.
Space mounts according to the exhaust maker’s layout, then check the system cold and hot where practical. Keep rubber isolators aligned, allow clearance around the pipe, and avoid forcing a hanger into position during installation.
A few millimetres can matter. SAE technical papers on exhaust durability also identify thermal cycling and vibration as contributors to fatigue; actual life depends on material, geometry, and operating conditions.
I still see fit-ups judged only while cold. That is an easy mistake. Heat the system, inspect for contact or tension, and revise spacing if the pipe pulls sideways.
A perfect-looking cold installation can behave differently after repeated heat cycles.
Verify Alignment, Clearance, and Mount Security
How to Properly Space Exhaust Mounting Parts
Verify alignment, clearance, and mount security before tightening the system. A pipe that looks centered when cold can shift as it heats. ASM International’s Metals Handbook lists a typical thermal expansion coefficient near 17 × 10⁻⁶ per °C for austenitic stainless steel. For a 600 mm section heated by 500°C, that implies roughly 5 mm of growth. Treat this as an estimate: actual movement depends on material, temperature, and pipe layout. Check clearance around the floor, fuel lines, brake lines, and suspension through their full range of movement. A close gap can become contact after a bump or heat cycle.
Tips: Support the exhaust naturally before securing hangers. Check that rubber isolators sit untwisted and that hanger rods do not pull the pipe sideways. Leave visible clearance at nearby components, then recheck alignment after lowering the vehicle. Small adjustments matter.
Mounts should carry the exhaust without forcing joints into alignment. Look for stretched rubber, bent rods, loose fasteners, and polished marks where parts have rubbed. A practical check is to move the tailpipe gently by hand; it should flex at the mounts without striking the body. I have seen a system appear secure on a lift yet touch a heat shield once the vehicle settled. Recheck after a short road test, when the assembly has warmed and moved. Don’t assume the first fit is perfect.
How to Properly Space Exhaust Mounting Parts - Verify Alignment, Clearance, and Mount Security
Example inspection record for a passenger vehicle exhaust system. Measurements are illustrative, not universal specifications; use the vehicle manufacturer’s service information for required clearances and fastener torque.
| Mounting Point |
Position Along Exhaust |
Hanger Alignment |
Nearest Body Clearance |
Mount Security Check |
Example Inspection Result |
| Front pipe support |
Near the front pipe connection |
Rubber isolator sits naturally; hanger rod is not forced against the edge of the isolator. |
22 mm to the nearest heat shield |
Check the support bracket and fastener for looseness, damage, or contact marks. |
Aligned; no visible contact or looseness. |
| Center pipe hanger |
Approximately 650 mm behind the front support |
Hanger rod is centered in the isolator with no obvious sideways preload. |
30 mm to the underbody |
Inspect the isolator for cracks, stretching, and secure seating on both rods. |
Secure; isolator shows no visible cracking. |
| Muffler inlet support |
At the muffler inlet area |
Muffler hangs level and does not pull the inlet joint sideways. |
25 mm to the floor pan |
Check the bracket welds and fasteners; confirm the joint is not supporting misaligned pipework. |
Level; bracket and connection appear secure. |
| Rear muffler hanger |
Near the rear of the muffler |
Isolator is seated fully, with the muffler centered in the available space. |
28 mm to the rear suspension area |
Look for torn rubber, a bent hanger rod, or polished areas that indicate contact. |
Centered; no contact marks observed. |
| Tailpipe support |
Near the tailpipe outlet |
Outlet is even within the opening and does not touch the bumper or trim. |
20 mm to nearby body trim |
Check that the hanger remains seated and the tailpipe stays clear when moved gently by hand. |
Secure; outlet remains clear of trim. |
Verification: Check clearances with the exhaust cold and inspect for contact again after the system reaches operating temperature. Exhaust components move as they heat up; follow vehicle-specific clearance and torque requirements.
Conclusion
Properly spacing exhaust mounting parts helps keep the system stable, quiet, and safely clear of nearby components. Begin by identifying each hanger, bracket, and isolator, and note where it supports the exhaust. Check the vehicle or system specifications for recommended clearances, then measure the exhaust’s position at several points to confirm that spacing is consistent and that pipes do not touch the body, suspension, or other parts. If you are asking, “What is the proper spacing for exhaust mounting parts,” the answer depends on the system design, mounting locations, and specified clearances rather than one universal measurement.
Install the mounts so they support the exhaust without forcing it into position. Leave enough room for heat expansion and normal movement as the system warms, cools, and vibrates. Once installed, inspect the full exhaust path for alignment and clearance, and make sure each mount is secure without being overly tight or strained. Recheck the spacing after installation to confirm the system remains supported and free to move as intended.

 GLX Auto Parts